As you may remember, the next project on our agenda was the creation of a headboard for our master bedroom. We purchased the wood several weeks back, but it sat in the trunk of my car for quite sometime. Then, it sat on the office floor. Finally, a few days back, I decided it had enough sitting.
This would be the first project that I would do "on my own". With the dining room table, Tyler had done most of the wood working. Sure, I drilled a couple of nails and helped clamp together some boards, but my role was mostly sanding, staining and assisting. This time would be different. While I sought Tyler's advice occasionally, I did 80-90% of the work. Did I make some mistakes? Yes. Do I wish I could do-over certain parts? Yes, but I have to say I'm very proud of the final product, and more importantly, Tyler likes it!
Before officially starting the project, Tyler and I waded through the wide variety of headboard options - fabric wood, tall, wide, etc. Quickly, we concluded that we liked the look of wood. However, wooden headboards came in their own variety of shapes, sizes and designs.
Vertical boards...
 |
| Source |
 |
| Source |
 |
| Source |
or without, like the headboard two images back. Light wood? Dark wood?
After much consideration, we decided we wanted our headboard to be composed of horizontal boards, in a variety of widths, stained a dark, rich walnut color.
Before beginning of the "heavy" labor, I had to buy a few final items for the project, namely wood screws. With the dining room table, we'd bought 2" #12 screws to accomodate the thick, wooden boards that would be potentially holding a great deal of weight - plates, serving bowls, vases, etc. The boards for the headboard would not be serving such a purpose so we bought thinner #8 screws. The screws would be drilled (part way) through the boards that would create the face of the headboard (3/4 in thick) and the 2 x 4s that would join the individual boards together. Therefore, I estimated that 2 in #8 screws would do the trick.
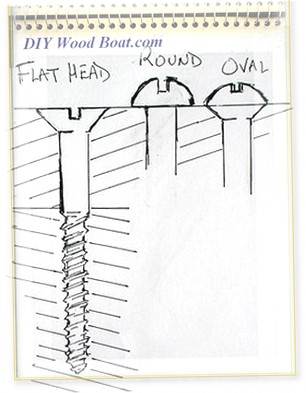
I should add that the screws were also of the "countersink" variety (or flat).
 |
| Source |
I had no idea before I got into DIYing that there were so many different types of screws, and each type serves a different purpose. It is overwhelming at times. We went with countersink screws because they would sit flush with the back of the 2 x 4s once they were in place. This would ensure that the screws would not scratch the wall behind it. As renters, the less damage we can do to our place, the better!
For the screws to actually sit flush with the wood, we had to buy a special drill bit, made for countersink screws. The bit would create the appropriate shape for the pilot holes (second from the left).
 |
| Source |
 |
| Source |
I was very excited about my new "tool" and thus, armed with the appropriate equipment, I was ready to officially get the project underway.
No comments:
Post a Comment