Monday, January 28, 2013

Fun Times with Gorilla Glue

I chose the title of this post because the project I'm about to describe uses a product called "Gorilla Super Glue", which I think sounds fabulous. Also, although the actual project has nothing to do with gorillas (sad), it has everything to do with glue (even sadder).

Months and months ago, I'd read about some woman who made a jewelry stand using old plates and candlesticks. The stands she created were adorable, and I longed to have one of my own. I found a few similar items on Esty, but they costs more than I wanted to pay. So, I went the DIY route. I made a little trip to a nearby Salvation Army, and bought three plates, each for exactly $1.00.

Counter-clockwise: Small, medium, large.

For many, many weeks, they have sat on the dresser in my bedroom, the two smaller plates stacked on top of one another, holding whatever jewelry (mostly earrings and bracelets) that gets thrown upon them at the end of the day.


My initial plan has always been to stack the three plates on top of one another to create a three-tiered stand. However, I had great trouble finding an item that would serve as a connecting piece. Most bloggers had used candlesticks, but after several searches, I had yet to spot any candle holders that I thought were small enough or attractive...that is...until...yesterday.

Yesterday, I made one of my infamous trips to Target or should I say...Tar-jhey. I have a slight problem because I can't seem to walk out of Target without buying about 10 more items than I originally planned on buying. It's really a problem. Nonetheless, while perusing the aisles of the store, I found this little cutie and knew my jewelry stand dreams were about to come true.

It's a very little, glass candlestick!
I fell in love with it immediately. The picture doesn't do it justice, but it is small, shapely and unassuming. It definitely wouldn't distract from the beauty of the plates and the small circumference of the top would eat up very little jewelry space on the plates.

Before using the Gorilla Glue to affix the candlestick to the plates, I used a damp cloth to wipe down both the small and medium plates along with the candlestick. Then, I flipped the smallest plate so that it's bottom was facing up. I was very very lucky because the candlestick actually fit perfectly inside the rim on the underside of the plate. Ready for action, I uncapped the Gorilla Glue and got ready to work. 


I squeezed a thin line of glue around the larger end of the candlestick and then placed the candlestick atop the plate's bottom. Once that was done, I carefully placed a heavier object atop the other end of the candlestick for about a minute to ensure that the two materials bonded.

Who knew a bowl of cherry tomatoes would be so helpful?!

After a minute was up, I gently lifted the candlestick to see if it had taken to the plate. Waaaaah, waaaaah, waaaaah. It was a failure!

That's my,"Grrrr. I'm frustrated!" face.

I went back to the packaging instructions, thinking I must have missed something.
"Bonds Metal, Wood, Ceramics, Leather, Paper, most Plastics and More." -- That's not the problem. "Excess glue can cause delayed or failed bond." -- Hmmmm. Maybe I wasn't as sparing as I should have been!

Guessing this is where I'd gone wrong, I wiped off any glue that lingered on the surface of both the plate and the candlestick with a damp paper towel, and tried again. This time, I was careful to squeeze out as little glue as possible. I also replaced the bowl of tomatoes and applied pressure with my hands for over a minute. I won't leave you in suspense. Unfortunately, all of these precautions made no difference! Grrrrr. The bowl and candlestick still weren't connecting.

But I still wasn't giving up! Again, I cleaned any glue remaining on the two objects. On my third and final try, I did not apply glue to entire rim of the candlestick. Instead, I applied glue onto five tiny sections of the rim. I applied pressure for a minute, and then I let the candlestick sit for several more minutes, before checking for success/failure. Guess what?!?! This time, it still didn't work! Grrrrrr.

Obviously, I'd mis-stepped somewhere, and realized I'd have to go to the source of all knowledge on Gorilla Super Glue - the Gorilla Glue website. Using their convenient product chart, I checked out the specs of my Gorilla Super Glue. Guess what?!? Gorilla Super Glue does NOT work on glass. Who feels dumb now? Me!! I obviously needed to be more thorough in the future. Grrrrr.

Back to the drawing board...

P.S. Information on the headboard project will be forthcoming. I have not forgotten!

Sunday, January 27, 2013

What's next?!

Since beginning this blog, I have determined that my father is my most devoted reader. He frequently comments on my posts and also sends me emails to let me know what particular piece of information he's enjoyed that day. So, I have to tell him publicly, "Dad, thank you. It makes me feel great to know you appreciate what I'm doing."

Given his earnest interest, it is no surprise that when challenged with the task of guessing my next project, one of Dad's two guesses was correct! He thought it either had to be a headboard or a picture frame. I'm here to tell you...it's number one folks! A headboard!

The space between our bed and the painting was growing more vast each day. Something had to be done, and this past weekend, I started doing it! Nothing's actually been built yet, but there were a few steps to be taken beforehand.

As much as I'd envisioned having a headboard, Tyler and I needed to figure out how large it would actually be. In came painter's tape - a girls' best friend. Painter's tape is super easy to use and as it's name would suggest, it doesn't ruin the paint on your wall! I whipped out our dwindling roll and got to work on the bedroom wall. Here is the final result:

Sorry for the poor quality. I had to use my computer's camera.

Hopefully, this gives you some sense of where the headboard will go. I realize the tape is a little off-center, but that's okay. It comes off easily! The best moment of all, however, was Tyler's comment afterwards. He said, "You know Jess, we could just paint inside the tape and it would probably still look really good." Mwahahaha. He's beginning to think like a DIYer!


Tuesday, January 22, 2013

Did We Really Just Do That?!?!?!

Several week ago, Tyler and I did something that I still can't quite wrap my head around.

It all started when Tyler and I got a new mattress last spring. We, in fact, didn't purchase the mattress, but received it as a gift from Tyler's parents. The gift of a new mattress was awesome enough, so we didn't expect anything else to come from our trip to Jordan's (the store). However, Jordan's Furniture was running a promotion that went as follows:

If the Red Sox baseball team hit the Jordan's Furniture sign over the course of their season, the mattress would be FREE. If they didn't, we would receive 20% of the purchase price back in Jordan's dollars. 

Turns out, the Sox didn't have a great season, which meant that they did not hit the Jordan's sign in Fenway Park. Thus, in October, we found ourselves with about $300 to use at Jordan's Furniture. Tyler and I were excited about the shopping trip because our place was in desperate need of more lighting fixtures. Eighteen foot ceilings require LOTS of light.

When we got to Jordan's, we were disappointed. A few items caught Tyler's eye, but I wasn't satisfied with the merchandise. I reasoned that we could come back a few weeks later when (hopefully) new merchandise had arrived. So, about a month later, we returned.

This time, I had promised Tyler that we wouldn't walk out of the store empty-handed. Determined to complete our mission, we perused the multitude of rooms that comprise Jordan's Furniture store. Unfortunately, the one light that we really liked on our previous journey was no longer available. Again, we found a couple of pieces that we kind-of liked. Unfortunately, we couldn't bring ourselves to spend money - even free money - on items we both felt were either low quality or could be bought elsewhere for cheaper.

As we wound our way through Jordan's twisty paths, resigning ourselves to defeat, Tyler made a sudden stop. He threw up his arms, dragged me across the floor, and pointed, "What about this?! We should spend the money somehow. Why not this?!" I looked, laughed, and replied, "Really? You've got to be kidding me." "Come on. It'll be funny," he said. "What else are we going to do?" Looking back, I must have had some sort of equally psychotic moment because I said, "Ok. Let's do it!"

So, that afternoon, we walked out of Jordan's with this...

The picture!

We even paid $30 dollars of our own money to get it! As crazy as it still seems - using our $300 free dollars for a canvas painting that I still think I probably could make myself - the purchase has actually worked out well. The picture brought some much needed color into our bedroom, and filled up some of the large space between our bed and the ginormo ceilings. It has also made it very clear what my next project should be. Look at the picture. Can you guess?!

Sunday, January 20, 2013

It's Supper Time!

Although it has been a while for you, literally, three hours after Tyler and I brought the table base upstairs from being spray painted, we finished the job! We were sooooo close, so we figured, "Why not?!?!" And now, I get to share it with you! I'm soo excited!!

Being two smart cookies, Tyler and I had flipped the table top upside-down onto our "dining room" floor before we'd gone downstairs to bring up the freshly painted base. When the base arrived upstairs, we placed it like so...

Please ignore my unattractive face.
Our first goal was to situate the base so that it stood evenly between the sides and ends of the table. More importantly, however, we wanted the legs of the table to be as straight as possible. Therefore, before making any placement decisions, we used a level to ensure the legs stood perpendicularly to the table.

Tyler with our best friend, Mr. Level.

Much to our chagrin, we realized, when working with pipes, it is near impossible to ensure a perfect 90 angle between the table and the pipe. We just had to accept that we'd have to get it as close as possible. Once the legs were adjusted to our liking, we began by eyeballing the placement and setting the legs down where we thought they should go. We followed up with a ruler so that our placement was more precise. Tyler is the king of precision, and went around the table numerous times checking....

Folks, that is sheer determination right there. Look at his face!
Once all four legs had been Tyler tested and approved, Tyler drilled SHORT holes where each of the screws would go in each flange (flat metal piece at the top and base of each leg).

Here we gooooooooo!!!
Once all of the short drill holes had been made, we removed the base so that we could prep to make real, appropriate-length pilot holes. First, we had to clean up the short holes, which looked like this:


Then, we sanded them down and wiped away any wood shaving from the area. Now, we were ready to create the pilot holes. This was probably the trickiest part of the whole attachment process. The drill bit was much longer than the actual thickness of our tabletop. Therefore, if we created pilot holes by drilling straight into wood, we would end up creating sixteen holes in our tabletop, which is not the look we were going for! Instead, we wanted to create pilot holes that ran about 3/4" into our 1.25" top. This would create the perfect hole for the 1" wood screws that we had bought. The first quarter-inch of the screws would sit atop the flange and the remaining three-quarters would grab onto the tabletop, making for a secure connection. Consequently, we had to come up  with a solution that would ensure the drill did not pass through the entire thickness of the wood. After a brief brainstorming session, we ended up using a piece of scrap wood, about an inch thick, to make up for the discrepancy between the length of the drill bit and the thickness of the table top.


The extra layer of wood would allow Tyler to push the drill bit all the way down, but the drill would only end up penetrating the tabletop to where we wanted it. With a solution a hand, Tyler got to drilling.


Sixteen pilot holes later, I stepped in with the vacuum to clean up all of the wood shavings that now littered the table and our floor.


Once, this was done, we were ready for the LAST step - drilling the screws into place. Hah! It already happened and I'm getting excited just thinking about it again. We decided to drill two screws into each flange first to make certain all of the legs were attached properly before securing any of them fully. 


As Tyler drilled a screw into place, I put my weight on top of the legs at the appropriate end. We did this to ensure that we wouldn't shift the placement of the base as we secured the screws. Then, Tyler went back around on his own drilling the final two screws into each flange.


Fortunately, all that I described above went smoothly. Our solution to the small drilling crisis worked out, and all of the screws easily fit into the pilot holes we'd created for them. Therefore, when Tyler completed his second go-around with screws, we were done! AHHHHHHHHHHHH! WOOOOOO!! Celebration-party dance time! We were so excited and proud of ourselves, and I'm very happy to finally share with you our brand-spankin-new DIYed dining room table. We hope you come to eat with us soon!

Isn't she pretty?!

P.S. Tyler was super cute, and surprised me that night by not only making dinner, but setting the table so we could eat there together for the first time. What a great boyfriend. =)


P.P.S. In case you're interested, our dining room chairs are "Tobias chairs" from Ikea. They are made from plastic and chrome-plated steel, and are surprisingly comfortable. The seats are sold in clear or gray. We went with the gray, and love how they add to the industrial vibe of our apartment.


Thursday, January 17, 2013

Having a Face Lift

No!

Don't go!

You're in the right place.

I promise!

It's still "A Work in Progress", just prettier! After about a month of staring at the blog's white background and wondering why I'd ever thought a border of leaves represented the content of my blog, I have finally made changes!

If you know me, I'm not tech savvy. In fact, I usually keep myself a great distance from anything resembling technology. After having a smartphone for six weeks, I returned it for a flip phone. TRUE STORY. Since dating Tyler, the tendency to avoid technology has gotten much worse. He absolutely loves it, which means I don't have to deal with it. (*Sigh of happiness*) It's one of the many reasons why I love him.

Yes, I know. It's silly and lazy of me to think this way. I openly admit it. Nonetheless, I am very excited about the growth and development of this blog, and I very much want to make it my own. Consequently, when I got home this evening, I had a little talk with myself, dug down deep and scheduled a date with the computer. In my fifteen minutes on Blogger, I'd say I accomplished a great deal. One might even say I mastered the web. Okay, "mastered" is definitely a stretch, but I totally figured some stuff out. =)

Enjoy the new look!

Parking Lot Painting

After the tabletop was stained and sealed, we were on a roll! All that remained to be done was spray painting the base of our table and attaching the two units together. Unfortunately, this was easier said than done.

With a couple of projects I've done pre-blog, I've discovered how fun and easy spray paint is. All you have to do is point and shoot. Unfortunately, spray paint and cold weather do not mix well, and most cans advise that you spray paint when the temperature is between 50 to 70 degrees Farenheit. Well, it's winter in New England and the temperature is rarely ever above 50 degrees! BOO.

So, the base just sat and sat and sat some more. We considered moving it into a large, airy indoor space and doing the painting there, but the idea of unscrewing the pipes, putting them in my car, driving them to another location, reassembling, painting, disassembling, etc. proved to be too much for our brains to handle.

So, the base continued to sit and sit and sit. Until, as you might imagine, the day finally came when we could spray paint! This past Sunday, the weather gods smiled down on us and Tyler and I took the opportunity to move the base from our apartment to the very large parking lot outside. We laid the base on a plastic tarp and secured it with various heavy objects. We took these two precautions because 1)we didn't want our building supervisor to get mad at us for painting the ground - although theoretically the black paint shouldn't have showed up on the tar, and 2) there was just enough wind to cause concern that the tarp might fly up, ruining our paint job.

To paint the pipes, we bought two cans of Valspar Flat Black spray paint.


To use spray paint, you have to shake the can thoroughly (about a minute or so) before its use. Very happily, I whipped out the first can of paint and got to shaking. When the right time came, I bent closely (6-8 inches) to the base and let 'er rip!! Now, you may think, "Hurrah! The table was getting painted", but no. Nooooooo, siree. The paint did not get the pipes. Instead, it leaked. All...Over...My...Hands. If you've never experienced this, well, that's good, because I don't think it normally does. However, spray paint oozing and dripping all over your skin does not feel good. In fact, it's a B&*$C to get off. (No, I wasn't perturbed or anything.) Nonetheless, I ventured forth like the brave (or crazy) DIYer I am and prayed that the second bottle would work properly. I definitely did not have the patience to make another trip to Lowes for more paint, nor did I want to waste the warm weather I had been blessed with. Fortunately, for you, me and Tyler, there is happy ending. When I hit the "spray button" on the next can, it worked! The paint went from the bottle to the table. Hallelujah!

The key to spray painting is keeping the can close (6-8 inches) to the object you're painting, but simultaneously moving the can back and forth over the object to create a THIN coat. If you let the can linger in one place to long, or go over the same surface too many times too quickly, you will cause the paint to drip. No one wants a drippy paint job. Therefore, several THIN coats are key. Luckily, you can apply coats every 5 minutes, so the process goes quickly. I ended up applying 3-4 coats of paint to the pipes, and only created 1 or 2 drips. Almost professional!

After fifty minutes of drying time, the pipes looked completely transformed. They went from this gunmetal-gray...


to sexy black!


I have to admit though, before we spray painted the pipes, I wasn't sure I was going to like the black. After weeks of sitting in our apartment, my brain had gotten so used to the silvery-gray pipes that when we went to paint them I felt like I was losing a little piece of home. In the end though, both Tyler and I agreed, the black looked awesome!

Wednesday, January 16, 2013

Jolly Polly

Applying polyurethane seemed to take foooooooooorever. If I'm being reasonable, I have to admit this was probably because Tyler and I went on a two week vacation in the middle of the process. However, even without our reprieve from work, this step of the project would probably have eaten up a number of days in our schedule.

I should begin by saying this is NOT because polyurethane is difficult to apply. It's actually rather straightforward. To start, we bought Minwax Water-Based Polyurethane, which came in a cheerful blue can.


As with the stain, we applied the polyurethane with foam brushes. Someone recommended that we use a new brush with each coat of polyurethane, and I had read somewhere that you should mix the polyurethane thoroughly before each application. To this end, we also acquired a number of paint sticks and 3" foam brushes (large enough so that it wouldn't take forever to apply, but small enough to fit inside the can).


To apply the first coat, we lightly sanded the (top of the) stained surface. Water-based polyurethane "sticks" to the wood less easily than oil-based, making this a necessary step. After a light sanding, we used a damp cloth to remove any dust that had collected on the table's surface, and then went back over it again with a dry cloth to be extra-safe. Some bloggers recommend using a talc cloth, citing that it is especially effective at picking up little particles. I have yet to try.

Once the surface was poly-prepped, we opened our can of polyurethane and stirred it with one of our painting sticks. Then, we wet the brush, again, only going in about an inch, and wiped any excess off using the rim of the can. Overloading your brush here is BIG no-no. If you apply water-based polyurethane too thickly, it will leave you with a milky-white surface. Therefore, several thin layers of polyurethane is best.

I was super paranoid about turning the table white. Therefore, we made sure to apply the poly in a well-lit room, constantly checking from various angles to ensure there was no white film forming. Otherwise, our application was very similar to that of staining - brush on, spread out, check for bubbles or pools of liquid, continue spreading, check one more time, finally dip again, and repeat. Once the entire surface is covered, you need to let the polyurethane dry for at least two hours before reapplying.

Everything was going well for us until the fourth application to the top of our table. (We ended up going with six on the top and sides, and three on the bottom.) Then, my worst nightmare came true! WHITE!!!! One of the boards had a knot in it. After we'd applied stain, Tyler and I were really digging the way the knot stood out. It added a cool dimension to the tabletop's appearance. Unfortunately, the polyurethane and the knot did not mix well. To be honest, I'm not completely sure what happened, but somehow we messed up. Tyler and I had no idea what to do. I frantically searched the internet for help, but in the end, we went with our gut.

FYI: That is not our table! I just wanted to show you my cool power tool.

I ended up using my handy-dandy sanding tool to eliminate the poly over the knot. I don't actually know if I got rid of it all. I simply sanded until the surface felt differently than it had before - less smooth. Another sign that I had eliminated the poly was that specks of unstained wood began to show through. This is important. I didn't want to completely eliminate the stained surface. I just wanted to make sure that I got to it. Once the dust was wiped away from sanding, I reapplied stain to the area to ensure that I still had the dark finish that I wanted. Instead of letting the stain sit for 30 minutes, this time, I let it sit for 5. Then, I wiped it off, and let it dry overnight before applying my next coat of poly to the table top. Fortunately, it worked out for us. However, I can't make any guarantees for future projects. My fingers were crossed the entire time!

As I mentioned previously, we applied six coats of poly to the top and sides. Once this was done, we flipped the table over and did the underside. As with stain, be careful when applying any liquid to the base of your tabletop. You do not want seepage! If you aren't careful, the polyurethane will drip down the sides and collect on the underside of your underside (your top!) to form a rim around the edge of your tabletop. Thus, when applying poly here, it is never a bad idea to run you brush around the rim of (what will be the top) to ensure any poly that did collect spreads out before it dries.

Overall, I'm happy with our work. No drips on the tabletop, and no white film! When you see pictures of the finished product (Coming soon!), you might notice the poly added a slight sheen to the tabletop. We used poly with a "Clear Satin" finish, which creates this effect. If you desire a different look, poly comes in other finishes (matte, semi-gloss, gloss).

P.S. Of all of those paint sticks and foam brushes we bought, we ended up using only one each! Do yourself a favor and save the money. All you have to do is thoroughly rinse the brush when you're done with one coat, and it will be as good as new for a second two hours later. Also, it's okay to use the same paint stick over and over again to stir. When we weren't using ours, we rested it in a plastic dish. No big deal.

Tuesday, January 8, 2013

Keepin' It Real

Dear Readers,

I wanted to come clean about something, and maybe, some of you have already realized this, which is great! However, my father who is a dedicated reader (Thanks Dad!) was quite confused the other day when visiting the blog. So confused, in fact, that he AND my mother called me up to clarify the situation. Consequently, I am now writing to make sure that no one else has to go through what they did. Here is my confession...

I am NOT blogging in real-time.

There, I said it. Unfortunately, it is nearly impossible for me to keep up with the actual events of our table making project. For example, my most recent post describes staining the tabletop. In reality, we finished this phase of the project a couple of weeks ago and have moved on. I am doing my best to catch you all up, but if you're a family member or a dear friend, you might find that what we've talked about in person doesn't necessarily align with the most recent blog post. I apologize for any confusion I may have caused.

Thanks for bearing with me!

Love,
Jessica

Nice, Even Strokes

Due to my fears about the "naked wood" and general excitement about the project, it did not take long for us to stain the tabletop after its assembly. Unfortunately, my schedule kept me away from this phase of the project, but Tyler did a great job, and my nightmares about an ugly table quickly dissipated as he got to work.

Tyler began by staining the underside of the table. Again, our thought was, "If we mess up, hopefully we can fix it, and no one will be the wiser". To apply the stain, we set the tabletop on a smooth/clean work surface. We completed this part of the project in a wood shop, so we didn't worry too much about drips or stains on the floor or application surface. However, in hindsight, I would say laying a plastic tarp between your tabletop and work surface is a SMART idea. Tyler then used small, foam brushes and 1 pint of Minwax Early American (stain) to complete the job. I have to say foam brushes are essential for application. One, they don't leave brush marks, and two, they don't leave behind thin bristles as other paint brushes might.

To apply:
1. Dip your foam brush in the stain about 1/2 an inch. Wipe off any excess along the rim of the can. (There is no need to dip the entire brush, as this would cause the brush to drip all over the place and would make it much harder to control your application.)
2. Begin with your brush near the edge of the tabletop. Apply the stain by moving your brush in a up and down motion, following the grain of the wood. As you complete the first section of the board, complete the same section on the two remaining boards before moving further down the tabletop.


3. As you move, dip your brush back into the stain every few strokes. You'll know when you're ready for more because the stain won't spread any further on the wood. However, do not reapply stain if it pools or bubbles on the wood's surface. If either of these instances occur, keep spreading until you have the stain sets evenly.
4. Repeat until you've covered the whole underside with stain.

Doesn't it look pretty?!?! 

5. Finally, let the stain sit. The can recommends 5-15 minutes, depending on how dark you want the stain to become. After doing sample patches on scrap wood, Tyler and I decided to leave it on for 30 minutes (starting after the underside was complete) to achieve the look we wanted.
6. When the 30 minutes was up, we wiped off any excess stain with paper towels.
7.  At this point, the hard work is over. You simply need to let the stain dry. I suggest leaving it overnight before flipping to complete the other side.
8. Once the appropriate drying time has elapsed, complete the top and sides using the process described above.

Overall, the staining process is relatively easy and fun. I'm pretty sure Tyler felt like he was Michaelango painting the Sistine Chapel. He really got into it. Do be prepared to set aside a couple of days though. Staining requires a lot of wait time. Your schedule will probably look something like this:

Day 1
30 minutes - Apply stain on the underside.
30 minutes - Wait for stain to be absorbed.
5 minutes - Wipe off excess stain.
Overnight - Allow stain to dry and set completely.
Day 2
40 minutes - Flip tabletop to apply stain on top and sides.
30 minutes - Allow stain to be absorbed.
5 minutes - Wipe off excess stain.
Overnight - Give stain time to dry and set.

Total Time: 2 days        Actual Time Putting in Physical Labor:  ~ 1 hr. 15 minutes


FINAL TIPS:
   - Be careful not to overload the brush when staining the sides. It is easy for drips to occur here.
   - Although you don't want the stain to drip through the tabletop, you also want to make sure the stain gets into any cracks in the wood or gaps between the boards. Go slowly in such areas.
   - When cleaning your foam brushes, do so with SOAPY water. The soap not only helps lift the stain off of the brush, but it also ensures that the stain will not blemish your pretty, white/cream/beige sink. If any residue is left on the sink's surface, just scrub it with a soapy cloth.

HAPPY STAINING!

Next up: Jolly Polly! (Applying Polyurethane)


Sunday, January 6, 2013

Putting the Pieces Together

PART ONE - THE PIPES

At first, I assumed that I would not need to write about assembling the pipes to create the base of our table. I mean, how hard is it for you to understand the following steps: create a design, clean, and screw together? Hopefully, it's not very hard. However, given that I've now lived through the process, there are a few quick tips I'd like to share:

1. When you think you've screwed enough, screw harder. The tighter the connection between your pipes, the more stable your base will be.

2. This is a two person job. At first, connecting one pipe to another isn't difficult. However, once your creation has grown, the pipe system becomes somewhat unwieldy. Therefore, if you want the best connections possible, use one person to hold the base steady, while the other, more muscular person screws tight. This also helps you to avoid hitting yourself and other precious objects (such as your bamboo floors) with heavy iron pipes.


PART TWO - THE WOOD

When we got to the wood shop, we laid out the three boards. It took a couple of minutes to decide which pieces fit together best. You might think the boards are cut 100% straight, but unfortunately, that is not the case. Therefore, shifting the pieces around helps you to get a sense of what fits best where. You will also need to decide which side of the board you want facing up. Once we figured that out those two things, we lightly marked one end of each board with an upward facing arrow (in pencil) so what we wouldn't rearrange things as we worked on the tabletop. 


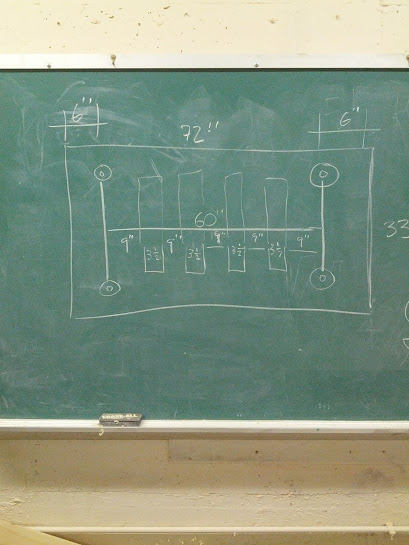
Next, we had to decide how to attach the three boards together. When we had gone to the lumber yard, several people suggested that we use a biscuit joiner. While we don't own a biscuit joiner, which can run anywhere between $90 and $200, one of my colleagues kindly lent us hers. Unfortunately, after playing with it on some scrap wood, Tyler and I decided to scrap the biscuit joiner. The tool itself was easy to use, but creating pockets in the wood that lined up properly proved difficult, and while we had bought relatively inexpensive wood, we didn't want to take the chance. So, we decided to use simple wood braces on the underside of the tabletop. Tyler drew this pretty picture below to map out our game-plan.


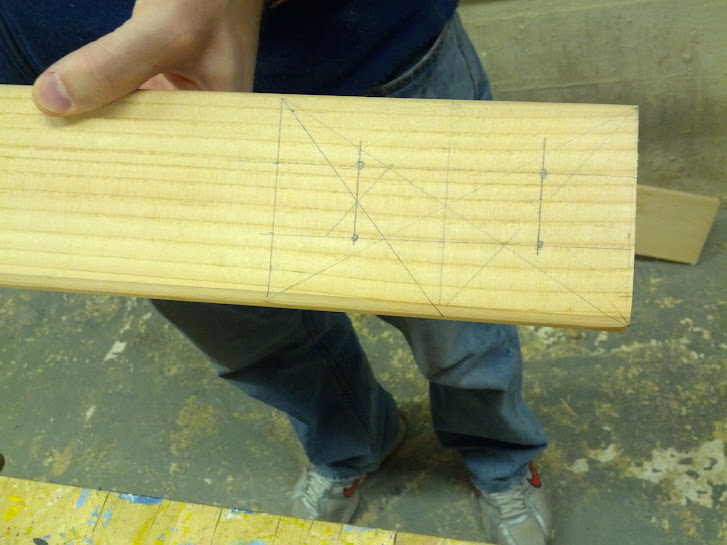
Can't you tell he's a math teacher! Very precise measurements. The idea is that we would connect the three boards with four 2 x 4s that had been cut to 22". Each brace would be centered over the middle board, overlapping with each adjoining board by  about 5 1/2" (or halfway on the next board). Ultimately, these pieces would fit underneath and within the pipe-frame base (drawn as the long middle line and 4 circles on the chalkboard). After our plan was complete, Tyler took the same, meticulous approach with the wooden braces. He carefully marked where each screw would go before we starting attached any two pieces. 


I promise you, there was some intense geometry going-on. We teachers don't mess around. Once all of the planning was completed, finally, the fun began! Power tools!!!! If you didn't know this about me, I LOVE power tools. Last year, my boyfriend bought me a KitchenAid mixer for my birthday. You might think, "That's not a power tool!" But, if you're in the kitchen, it is! It was my dream present. No joke. This year, for Hannukah, his parents bought me a multi-use power tool. Again, I fell in love. So, as you might imagine, I was not about to let Tyler had all of the fun with the drill. 

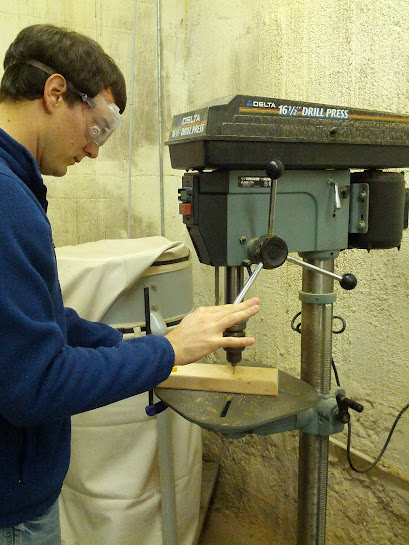
First, using our chalkboard drawing, I marked where each brace would lie on the middle board. As I did this, Tyler drilled pilot holes (slightly smaller than the actual screws we were going to use) into each of the marks he had previously made. Creating pilot holes would help the screws to grip the wood more easily when we finally drilled them. 


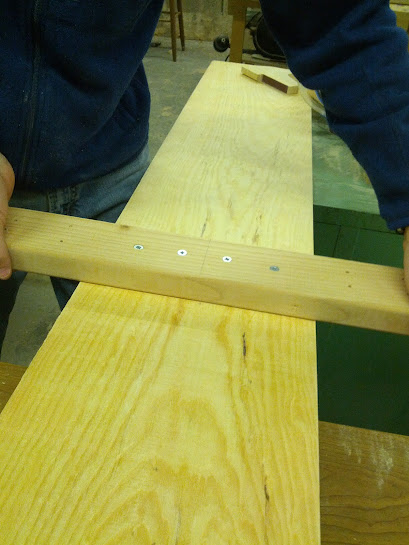
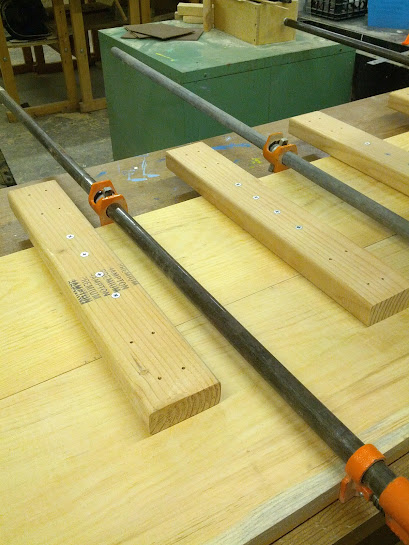
When Tyler was done with the pilot holes, it was time to drill! Using two clamps, we secured the first brace to it marked location on the middle board. Then, we very carefully drilled in each of the four screws located in the middle of the brace. Below, you can see how we attached the first brace, and how I am very skillfully handling the second. We repeated this step until each of the four braces was attached to the middle board.


To attach the first side piece, we used three GIGANTIC clamps (below). The clamps ensured that the boards would not shift as we drilled, and they allowed us to place the boards as closely together as possible. While the connection wasn't perfect, any gaps that did appear were negligible. Then, as with the middle board, we drilled four screws through each brace into the board, this time using a rectangular pattern instead of a straight line. We completed the two middle braces first and then attached the two side braces, figuring this would make for the most stable connection. 


To connect the final board, we adjusted the clamps to fasten the three boards together and repeated the drilling process described above. When this was done, vwaaaaaaah-la! We had our tabletop! The entire process (PART TWO) probably took us two to three hours. Unfortunately, I don't have a picture of the three boards after they'd been connected. You'll just have to imagine it. 

I do want to say though, despite the pride I felt about what we had just accomplished, I was worried. The tabletop did not look very attractive. As you can see in the pictures above, plain pine is not exactly "poppin". I was a slightly concerned about how beautiful the table was actually going to look. Nevertheless, I kept my fingers crossed, hoping that when it was stained its appearance would improve.


Thursday, January 3, 2013

Going to the Lumber Yard

WARNING: This blog post does not have any pictures. Proceed with caution.

After selecting a stain and having the pieces to our base assembled, the next step was to buy some wood so that we could actually make the table top. Although I didn't anticipate it, this part of project became the longest and most arduous.

As I've mentioned in a previous post, Tyler and I originally thought we'd be building the table out of hardwood. As the name indicates, hardwoods are best for tables because they are, in fact, hard. It is difficult to create dents, dings, etc. Unfortunately, as I also previously mentioned, hardwood is expensive! Thankfully, we both quickly came around to the idea of using pine - a softwood that is also relatively inexpensive. We appeased each other by telling ourselves that it was our first table, and if we messed up we didn't want to do it on something expensive. We also realized that we were actually okay with having a dinged up table. It would create charm.

We ended up going to two lumber yards. Our first visit was to a local lumber yard that we drive by on our way to work everyday. The service there was great! We asked a lot of questions, and the employees were VERY patient (Thank you Hans!) with us as we visited and called the store on numerous occassions without really buying anything. During our last visit to the local lumber yard, Hans suggested that we visit another lumber yard that was a few towns away. I realize now that it sounds like he was tired of listening to us, but I swear that's not the case! He even said, "I don't want to lose you business, but it sounds like _(name of the other place)_ probably has more of what you're looking for". I swear we weren't that bad! Given his kindness and patience over the past week or so, we heartily thanked him and set of to our next destination.

The second lumber yard was FOR REALZ. The first lumber yard had been contained to one building, but this place was huge. There was wood everywhere - piles and piles of it! We ended up spending two hours there, only two buy 3 boards of wood. I would venture to say that is an unusually long period of time, and the only reason we were there that long was due to two mitigating factors. One, it was snowing the day we went and there was only one man at work, making the process of getting through custumors go much slower than it normally would. Two, Tyler and I had never done this before!

The lumber yard had several different grades of pine wood, and each came in various widths, lengths and thicknesses. The width of the the boards affected the look of the table, so we had to imagine how our  table top would look made out of 3, 4, 5, or more boards. We liked the idea of an odd number of boards, but given the available widths or options were limited. We could either go with 3 11 2/4" boards, making our tabletop about 34 inches wide, or we could go with 5 9" boards, giving us 45" wide table. Considering the limited space in our "dining room", we opted for the former.

Once we figured that out, then, we had to find 6 ft. boards (the length we'd pre-determined for the table) with that width or we'd have to pay for more wood than we actually needed. Unfortunately, there weren't many, maybe 4 or 5, and not all of the boards were uniform in their thickness. Fortunately, however, the lumber yard was kind enough to cut down some 8 ft. boards for free, giving us a couple more options.

Finally, after we'd weeded out any width/length/thickness issues, we had to inspect the boards that were available for knots, splits and grain. Obviously, we wanted to avoid any splits or cracks in the wood, but we also chose boards that had few knots, unique grain patterns, or discoloration. Some of the boards had grey streaks or had a reddish tint. We thought that by choosing "clean" looking wood, the tabletop would look more uniform and polished.

At the end of the day, we walked away with 3 11 1/4" boards that were 6 ft long and 1 14/" thick, which cost us approximately $45. Not bad.