Friday, August 16, 2013

A Coffee Table Update...Finally!

The last time I wrote, oh so many months ago, I was debating what type of coffee table to purchase for our living room. I searched and searched and eventually found our new baby at Overstock.com. I've never purchased anything from Overstock before, but the customer reviews were positive and the price (about $160) could not be beat!

Source

We've had the table now for a couple of months, and we love it! The frame turned out to be darker than it appears in the picture - less bright silver, more dark gray. However, this actually helps the table to better fit in, as we have other dark, gray objects in the room. The glass top keeps the space open, and the circular shape helps to break up the many 90 degree angles we've already. We're so happy with the purchase, and hope to keep this table for a long time.

That's HGTV in the background!


Tuesday, May 14, 2013

Coffee Table Re-mix

When we were first moving into our apartment, Tyler's mother offerred to give us her outdoor coffee table. Of course, we don't have an outdoor space, but we did need one for our indoor living room. The table was/is gorgeous. It is a big rectangle of heavy, weathered metal that looks super rustic and cool. We loved it and were happy to bring it home.

Last week, Tyler's mom called and let us know that she would be needing the table back. While we still loved the table, this news was actually very exciting. In our many months with the table, we'd come to realize that while gorgeous, it wasn't the best fit for the space we had. So, we're giving the table back, and more importantly, this gives me the opportunity to find a new one!

Naturally, I'm not super keen on buying a new, expensive table, when I can buy something much cheaper that I can then make-over using some Jessica-magic. Tyler and I have both agreed that we think something circular might be best. Our living room is currently filled with right-angles, and this will hopefully soften up the space. Here are a couple of my ideas:

Option #1:


I love the idea of using "wine barrels" to create a coffee table. Home Depot sells these for about $30 each, which is totally reasonable! 

Option #2:

This table is something I think Tyler would definitely appreciate. It's got that modern, geometric aesthetic that he likes. I think a darker stain would be better in our apartment, but I like the overall look. 

Clearly, you can see I appreciate the combination of a glass top and wood base, and our living space would definitely benefit from the more open, airy feel. I'm hoping a glass top will help to create that vibe.

At this point, who knows what it will be, but craigslist here I come!


Wednesday, May 8, 2013

Some Simple Additions


If you've ever visited our apartment, I've probably kept my fingers crossed that you would never ever open the door to the bathroom cabinet. This particular area is one I am not proud of, simply put, because it is a hot hot mess. While there is a semblance of organization below - some boxes on one side and some piles on another, our stuff generally meanders from side to side, slipping around until one of us realizes we can't find it and has to go digging through the piles that exist below. Then, we rearrange, convincing ourselves, "Oh! It's gotten cleaner!"

SO NOT TRUE.

So, where am I going with this you may ask? Well, one day, in my inevitable struggle with the behemoth that is my bathroom cabinet, I decided that it might be helpful to store some of the stuff under the sink elsewhere. Genius! I know.

The first idea that struck was to remove the handful of perfume bottles I had down there. Now, I don't wear tons of perfume. In fact, I wear it maybe only once a week when I remember that I actually own some. However, in my recent blog reading/Pinterest adventures, I begun to take notice of beautifully coiffed dresser tops, such as this one:

Source
The image above captures styling done by one of my favorite bloggers, Emily from Cashmere and Cupcakes. I looooooooooove it. Although, not 100% obvious, what struck me most about the design was the tray holding her perfumes and random pieces of jewelry. After more serious inspection, I concluded that the tray is made of lucite. However, upon first glance, the tray bottom looks like a mirror, and when I saw it, I knew I wanted something very similar. Plus, the entire arrangement looks so unbelievably elegant - the clear bottles, clean white backdrop, touches of gold and the lonely pink flower. I set out to achieve the same vibe for my own space.

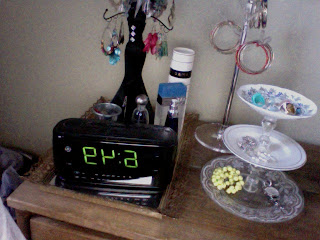
On a trip to one of my favorite consignment stores, I spent about an hour or so perusing the many rooms for the perfect tray. Finally, tucked away under a myriad of antique brushes, I found it. It had a mirrored bottom (check!), edged by a gold, lacy trim (elegant, check!). It was $18 and I knew it would look awesome housing my perfume bottles and other accoutrements. I also happened to receive a gift from my one of students around the same time - a jewelry tree! With my two new accessories in hand, I went on my merry styling way. Here is the end result...


Unfortunately, I don't have a before photo, but I love the after. While it is not exactly the clean and pristine look of Emily's dresser, it looks so much more organized and sophisticated than it did before. Now, all I have to do is get a new clock. =)


Monday, May 6, 2013

On My Own...

"...pretending he's beside meeeeeeeee!" Yes, I am singing the title of this post to that very tune from The Phantom of the Opera. Don't judge.

In case you've been wondering in the many, many weeks I've been away, yes, we finished our headboard. Contrary to the title of this post, I did NOT complete this task on my own. My muscles, as I've alluded to previously, are too puny, and I needed my handsome and more importantly strong boyfriend to help me.

We decided that we'd secure the headboard to our metal bedframe. I've read about others who have bolted the headboard to the wall, but given the fact that we've already made so many of those (holes) in our apartment walls, I was hesitant to make more.

Together, we moved our bed about a foot away from the wall. Then, we brought the headboard in, slowly shifting it into place behind the frame. Earlier, I had outlined circles (four) where the bolts would screw through the frame, and drilled holes through the center of each. Once the holes on the legs of the headboard were lined up with the holes in the frame, I screwed the bolts through each end while Tyler held the headboard in place. Then, he tightened things up (again, bigger muscles). Finally, we were done!

For some reason, the headboard appears crooked in the picture,
but I swear it does not look that way in real life.

While I was not completely pleased with the final product, Tyler liked it - mistakes and all. Since it's been up, I've done a decent amount of reflection and I want to clarify something important. My friend, Greg, probably summed it up best when he commented, "Gee, Jess. You made it seem like the worst project ever." He followed me as I blogged about the project, which made me feel awesome. (Thanks Greg!) Going back, and re-reading some of my posts, I realized that he was right. During each phase of this project, I had felt as though this project was doomed to fail. It was tiring and it made me pissy. Even now, months later, I could tell you a handful of things that still bother me about the headboard. In the end though, I realized that all of that crap was what doing it all by myself - on my own - is all about. It's about making mistakes. It's about getting frustrated, even failing at times, and then learning.

So, despite my negative attitude when originally posting about this project, I'm so grateful for it. Because strangely enough, a part of me likes making mistakes. I like knowing that I'm not going to get it perfect the first time. I enjoy the process of figuring it out, and feeling like I'm improving each time. That's the beauty of DIY.

Wednesday, May 1, 2013

Living with Jessica

TRIAL #1:
I may have mentioned once before that taking me on a trip to Target is never a good idea. Inevitably, I walk away from the store having spent way more money than I intended. At this point in our relationship, I'm pretty sure Tyler equates Target with being in debt, but I can't help it. There are so many wonderful things to find!

On one of my expeditions, several months back, I found a beauuuuutiful green table lamp that was on sale for $15!!! It's emerald exterior and smooth glass finish caught my eye right away, and who can ignore a bold red price tag that screams, "I cost much less than I used to!!" What kind of person would pass that up?!

Exactly this shape, but a pretty green color!


Obviously, not me.

Now, I admit. On most occasions to Target, I do remind myself that I have a significant other with whom I share my living space, and I resign myself to the fact that if I get home and he doesn't like it, I can always make a return. But, I knew this was NOT about to happen with my new lamp. Whether Tyler liked it or not, I was keeping it...even if that meant hiding it in the closet until I could sneak it past him.

Thank God, Tyler had enough sense to like it. It wasn't his favorite item, but he recognized the crazy in my eye that night and allowed it to stay. The one, singular "problem" with the lamp - and I really hate the word problem, challenge might be more appropriate - was that it did not have a lamp shade. Personally, I didn't mind, but after a week or two it made Tyler go crazy, and on a subsequent trip to Ikea, he very thoughtfully bought a shade for the lamp's naked top. Although a thoughtful move, I will confess that my first thought about the shade was, "It looks like someone urinated on that".

The flash washed out the image. Trust me.


TRIAL #2:
Unfortunately, as it happens sometimes, my filter didn't kick in and I shared that comment with Tyler. I'm a big believer in honesty makes a relationship stronger, but this urine comment wasn't my proudest moment.

In my defense, the shade is definitely pee-colored yellow, and after a few weeks, Tyler thankfully came to the same conclusion. Since then, I've fervidly been searching for a replacement, and have brought home multiple shades varying in size, shape, and pattern. This past weekend, on a trip with some of my students to Target (duh!), I hit the jackpot. This time, I remained optimistically hopeful, crossing my fingers that Tyler would like it and I wouldn't have to make a return.

Well, ladies and gentlemen, the shade fit perfectly, AND Tyler liked it! I had struck gold.

Source


To be frank, Tyler and I both won that night. He finally convinced me to move the lamp from the living room to our home office. He had mentioned a time or two that the lamp looked odd floating in the middle of our living room, and finally, I had to admit that the teardrop shape of the base, while gorgeous, did seem strange. The lamp needed some sort of backdrop to highlight it's curves. The table against the wall in our office turned out to be the perfect spot.


P.S. Besides my spending habits at Target and my inconsistent filter, I'm pretty much the perfect girlfriend. =)

Joke.

P.P.P.S. My first thought post-lamp transfer was, "I get to buy a new one for the living room!!!"

No joke.


Monday, March 4, 2013

Finally, Fun.

At some point during my staining fiasco, I also realized that the support beams, or the "legs" of the headboard, were too long and needed trimming. Really? Really! If left unattended, the headboard was going to overlap with the lovely painting already resting above our bed.

Considering that I had already assembled the headboard, I knew lugging it to the chop-saw at school would be near impossible and definitely impractical. Hand-sawing was my only option. Fortunately, what appeared to be another irritating situation turned into a fun.

Tyler, whose had some experience with a hand saw, instructed me to hold the blade lightly, making sure to use the length of the blade as I saw. His advice was duly noted, for I discovered when I did the opposite, I was not making as much progress.  

Getting to this point with the first leg...


definitely caused me to work up a sweat, and I realized the potential for getting in a really good arm workout with the second (or so I convinced myself). Being semi-nerdy, I decided to not only challenge myself physically, but find a cool way of calculating how fast I could take down the second leg. Any old stopwatch just wasn't going to cut it. My answer was Guster.

To those of you unfamiliar with "Guster", it is the name of an alternative rock band who became quite popular in the late '90s. I don't believe I actually started listening to them until quite a bit later, maybe college, but I quickly became addicted to their song entitled, "Demons". So, as I approached my second leg, I queued up a few Guster classics to play as I went to work.

My progress went as follows:

Great Escape, 3:06


Happier, 3:49 

Yes! Over halfway there!

Amsterdam, 3:39

Almost!
Demons, 4:28

So close!!!

After "Amsterdam" ended, I was convinced that I would be able to finish with only one more song. Alas, "Demons" proved to be 30 seconds too short, or my arm muscles proved to be too puny - depends on how you want to look at it. Nonetheless, in about 16 minutes, I had completed my mission, and the headboard was finally ready to be attached to our bedframe.


Friday, March 1, 2013

Getting High

No, Dad. Calm down. I did not do drugs, but I did stain a large piece of wood (Minwax Dark Walnut), and in the process, probably killed a few hundred brain cells.


For some crazy reason, when I decided that I was going to complete the headboard project in the apartment, I figured that staining the wood indoors would be fine. I thought to myself, "The stain will only be on the wood for about 15 minutes before I wipe it off. That's not too long. I'll just stay in the other room and the high ceilings will take care of the smell."

Of course, my logic was flawed. Just because I had wiped off the excess stain did not mean that the stain soaking into the wood would dry immediately. It also did not guarantee that the smell wouldn't permeate the room, fill my nostrils, and give me a headache.

Lesson learned. Stain OUTDOORS.

Unfortunately, the hits did not stop coming. Although applying the stain to the front face of the headboard was easy, covering the sides and the legs was not. As it stood, I couldn't safely reach all of the crevices on the underside of the headboard due to their proximity to our pretty bamboo floors.

In order to accomplish that, I would have to flip over the headboard, and given that I had to wait for the front to dry, I figured I might as well also wait for the pungent smell to disappear before further enhancing its potency. Little did I know, this would take twenty-four hours. ERGH. The unexpected time lapse killed me, and to be frank, as I recall the experience, it simply makes me want to stop talking about it.

It was tedious and painful, and therefore, I'm going to save both you and I from reliving my mistery. Yes, it was THAT bad, which brings me to my final lesson of the day. Stain BEFORE assembly. If I could go back in time and do it, I would.


Wednesday, February 27, 2013

Leaving My Mark

Tyler and I made the decision to construct the headboard at home.  All of the items we needed for the project were in the apartment, and keeping everything within the confines of our abode would mean less schlepping up and down the stairs and in and out of cars.

We laid out the boards on the office floor - the most convenient spot in our apartment. It is carpeted, meaning no scratching our floors, and it sees the least foot traffic on a daily basis. I also figured that if wood shavings end up in the carpet we'd vacuum them up, or they would blend in! No big deal.

Laying down the boards required that I actually placed them "face-down" on the floor. Tyler and I happened to be very interested in the texture and grain of the wood that we would be seeing, but if you're not too finicky about it, you can simply slap the boards on the ground without a thought. Unfortunately for me, I actually forgot that Tyler and I had a particular design in mind and I failed to check that my boards were "face-down". I ended up screwing the top two boards into the support beams before realizing my mistake. There goes things going perfectly!

Once the boards were laid out, I marked the placement for each of my three 2x4 supports. All three beams would lie 2" from the top edge of the headboard. Leaving space between the top of the headboard and the actual support beams creates a gap that allows the support beams to go unseen (Petersik and Petersik, 89).

The position of the two side supports had to be measured carefully. I had to ensure that the beams would line up exactly with frame of my bed, where they would eventually be attached. Once this was done, I eye-balled the placement of the third support beam - about center on the "back" of the boards. Then, I prepared to drill! As with the dining room table, I had to create pilot holes to ensure that my screws would take to the wood easily.

Fortunately, I had my handy dandy countersink bit.


With this tool, I was able to simultaneously drill both a pilot hole and the necessary space for my countersink screw. All I had to do afterwards was change out the countersink attachment, replace it with my screwdriver head, and drill the screws. Unfortunately, my handy dandy countersink bit turned out to be not so handy-dandy! On the third hole, into my FIRST support beam, the drill bit snapped, leaving behind the thin, metal portin of the bit stuck inside my 2x4!


Clearly, I was not going to buy a second one, because the first one did such a good job. Consequently, I had to resort to a more laborious process:

1)Place in appropriately sized drill bit.
2) Drill pilot hole.
3a) Remember not to touch drill bit - it's hot!
3b) Remove drill bit.
4) Replace with countersink top.
5) Create countersink hole.
5) Remove countersink top.
6) Insert screwdriver top.
7) Drill in screw.
8) Repeat process for remaining 25+ screws.


Although the actual completion of this step probably didn't exceed 30 minutes, it felt like an eternity. Nonethless, when it was all said and done, I felt as though I had accomplished a great feat, and I'd done it all on my own! Ok, well maybe 80% on my own. Given the problems I'd had, I figured things could only get better from there. Little did I know...


Monday, February 18, 2013

...and we're back!

Sorry, I've been gone for so long. I really have no excuse, except to say that a few weeks back we reached the midterm at school, which meant I was busy with grading tests, calculating averages, and writing student comments. Since then, I've allowed myself to laze about a bit. Now, after a 4-day weekend, I'm ready to get back to it.

As you may remember, the next project on our agenda was the creation of a headboard for our master bedroom. We purchased the wood several weeks back, but it sat in the trunk of my car for quite sometime. Then, it sat on the office floor. Finally, a few days back, I decided it had enough sitting.

This would be the first project that I would do "on my own". With the dining room table, Tyler had done most of the wood working. Sure, I drilled a couple of nails and helped clamp together some boards, but my role was mostly sanding, staining and assisting. This time would be different. While I sought Tyler's advice occasionally, I did 80-90% of the work. Did I make some mistakes? Yes. Do I wish I could do-over certain parts? Yes, but I have to say I'm very proud of the final product, and more importantly, Tyler likes it!

Before officially starting the project, Tyler and I waded through the wide variety of headboard options - fabric wood, tall, wide, etc. Quickly, we concluded that we liked the look of wood. However, wooden headboards came in their own variety of shapes, sizes and designs.

Vertical boards...

Source 
Horizontal boards...

Source
With a frame...

Source


or without, like the headboard two images back. Light wood? Dark wood?

After much consideration, we decided we wanted our headboard to be composed of horizontal boards, in a variety of widths, stained a dark, rich walnut color.

Before beginning of the "heavy" labor, I had to buy a few final items for the project, namely wood screws. With the dining room table, we'd bought 2" #12 screws to accomodate the thick, wooden boards that would be potentially holding a great deal of weight - plates, serving bowls, vases, etc. The boards for the headboard would not be serving such a purpose so we bought thinner #8 screws. The screws would be drilled (part way) through the boards that would create the face of the headboard (3/4 in thick) and the 2 x 4s that would join the individual boards together. Therefore, I estimated that 2 in #8 screws would do the trick. 

I should add that the screws were also of the "countersink" variety (or flat).

Source


I had no idea before I got into DIYing that there were so many different types of screws, and each type serves a different purpose. It is overwhelming at times. We went with countersink screws because they would sit flush with the back of the 2 x 4s once they were in place. This would ensure that the screws would not scratch the wall behind it. As renters, the less damage we can do to our place, the better!

For the screws to actually sit flush with the wood, we had to buy a special drill bit, made for countersink screws. The bit would create the appropriate shape for the pilot holes (second from the left).

Source
Source

I was very excited about my new "tool" and thus, armed with the appropriate equipment, I was ready to officially get the project underway.

Sunday, February 3, 2013

If at first you don't succeed...

...try a different type of Gorilla Glue!

After a busy week, I finally made it back to Target where I picked up the type of Gorilla Glue that would bond glass to ceramics. The result...voila! my new jewelry stand!

Above.

From the side.

I absolutely love it. It's so cute, and it perfectly contains the jewelry that I often throw to the side at the end of the day. What you see before you, however, did not come without its own set of challenges. Unfortunately, nothing about this DIY project went smoothly.

I discovered why this type of Gorilla Glue is not called SUPER glue:

1. Waiting time is no longer 1 or 2 minutes, but 1 or 2 hours. Errrg.

2. Putting pressure on the two newly attached surfaces is key. Otherwise, the resulting bond will not be as strong.

3. Regular Gorilla Glue expands. Therefore, gentle pressure when squeezing is key, as is a damp rag/Q-tip to wipe away an excess that oozes out when the two surfaces meet. 

4. Always, always, check the position of your candlesticks from multiple angles before allowing the glue to set. I discovered AFTER the glue had dried that one of my tiers wasn't centered, making the entire stand look wonky. Fortunately, someone online claimed that glass cleaner would break down the glue, which meant there was hope that I could correct my mistake. A couple of spritzes plus two minutes to soak did the trick, and I happily made my repairs in a matter of minutes.


Monday, January 28, 2013

Fun Times with Gorilla Glue

I chose the title of this post because the project I'm about to describe uses a product called "Gorilla Super Glue", which I think sounds fabulous. Also, although the actual project has nothing to do with gorillas (sad), it has everything to do with glue (even sadder).

Months and months ago, I'd read about some woman who made a jewelry stand using old plates and candlesticks. The stands she created were adorable, and I longed to have one of my own. I found a few similar items on Esty, but they costs more than I wanted to pay. So, I went the DIY route. I made a little trip to a nearby Salvation Army, and bought three plates, each for exactly $1.00.

Counter-clockwise: Small, medium, large.

For many, many weeks, they have sat on the dresser in my bedroom, the two smaller plates stacked on top of one another, holding whatever jewelry (mostly earrings and bracelets) that gets thrown upon them at the end of the day.


My initial plan has always been to stack the three plates on top of one another to create a three-tiered stand. However, I had great trouble finding an item that would serve as a connecting piece. Most bloggers had used candlesticks, but after several searches, I had yet to spot any candle holders that I thought were small enough or attractive...that is...until...yesterday.

Yesterday, I made one of my infamous trips to Target or should I say...Tar-jhey. I have a slight problem because I can't seem to walk out of Target without buying about 10 more items than I originally planned on buying. It's really a problem. Nonetheless, while perusing the aisles of the store, I found this little cutie and knew my jewelry stand dreams were about to come true.

It's a very little, glass candlestick!
I fell in love with it immediately. The picture doesn't do it justice, but it is small, shapely and unassuming. It definitely wouldn't distract from the beauty of the plates and the small circumference of the top would eat up very little jewelry space on the plates.

Before using the Gorilla Glue to affix the candlestick to the plates, I used a damp cloth to wipe down both the small and medium plates along with the candlestick. Then, I flipped the smallest plate so that it's bottom was facing up. I was very very lucky because the candlestick actually fit perfectly inside the rim on the underside of the plate. Ready for action, I uncapped the Gorilla Glue and got ready to work. 


I squeezed a thin line of glue around the larger end of the candlestick and then placed the candlestick atop the plate's bottom. Once that was done, I carefully placed a heavier object atop the other end of the candlestick for about a minute to ensure that the two materials bonded.

Who knew a bowl of cherry tomatoes would be so helpful?!

After a minute was up, I gently lifted the candlestick to see if it had taken to the plate. Waaaaah, waaaaah, waaaaah. It was a failure!

That's my,"Grrrr. I'm frustrated!" face.

I went back to the packaging instructions, thinking I must have missed something.
"Bonds Metal, Wood, Ceramics, Leather, Paper, most Plastics and More." -- That's not the problem. "Excess glue can cause delayed or failed bond." -- Hmmmm. Maybe I wasn't as sparing as I should have been!

Guessing this is where I'd gone wrong, I wiped off any glue that lingered on the surface of both the plate and the candlestick with a damp paper towel, and tried again. This time, I was careful to squeeze out as little glue as possible. I also replaced the bowl of tomatoes and applied pressure with my hands for over a minute. I won't leave you in suspense. Unfortunately, all of these precautions made no difference! Grrrrr. The bowl and candlestick still weren't connecting.

But I still wasn't giving up! Again, I cleaned any glue remaining on the two objects. On my third and final try, I did not apply glue to entire rim of the candlestick. Instead, I applied glue onto five tiny sections of the rim. I applied pressure for a minute, and then I let the candlestick sit for several more minutes, before checking for success/failure. Guess what?!?! This time, it still didn't work! Grrrrrr.

Obviously, I'd mis-stepped somewhere, and realized I'd have to go to the source of all knowledge on Gorilla Super Glue - the Gorilla Glue website. Using their convenient product chart, I checked out the specs of my Gorilla Super Glue. Guess what?!? Gorilla Super Glue does NOT work on glass. Who feels dumb now? Me!! I obviously needed to be more thorough in the future. Grrrrr.

Back to the drawing board...

P.S. Information on the headboard project will be forthcoming. I have not forgotten!

Sunday, January 27, 2013

What's next?!

Since beginning this blog, I have determined that my father is my most devoted reader. He frequently comments on my posts and also sends me emails to let me know what particular piece of information he's enjoyed that day. So, I have to tell him publicly, "Dad, thank you. It makes me feel great to know you appreciate what I'm doing."

Given his earnest interest, it is no surprise that when challenged with the task of guessing my next project, one of Dad's two guesses was correct! He thought it either had to be a headboard or a picture frame. I'm here to tell you...it's number one folks! A headboard!

The space between our bed and the painting was growing more vast each day. Something had to be done, and this past weekend, I started doing it! Nothing's actually been built yet, but there were a few steps to be taken beforehand.

As much as I'd envisioned having a headboard, Tyler and I needed to figure out how large it would actually be. In came painter's tape - a girls' best friend. Painter's tape is super easy to use and as it's name would suggest, it doesn't ruin the paint on your wall! I whipped out our dwindling roll and got to work on the bedroom wall. Here is the final result:

Sorry for the poor quality. I had to use my computer's camera.

Hopefully, this gives you some sense of where the headboard will go. I realize the tape is a little off-center, but that's okay. It comes off easily! The best moment of all, however, was Tyler's comment afterwards. He said, "You know Jess, we could just paint inside the tape and it would probably still look really good." Mwahahaha. He's beginning to think like a DIYer!


Tuesday, January 22, 2013

Did We Really Just Do That?!?!?!

Several week ago, Tyler and I did something that I still can't quite wrap my head around.

It all started when Tyler and I got a new mattress last spring. We, in fact, didn't purchase the mattress, but received it as a gift from Tyler's parents. The gift of a new mattress was awesome enough, so we didn't expect anything else to come from our trip to Jordan's (the store). However, Jordan's Furniture was running a promotion that went as follows:

If the Red Sox baseball team hit the Jordan's Furniture sign over the course of their season, the mattress would be FREE. If they didn't, we would receive 20% of the purchase price back in Jordan's dollars. 

Turns out, the Sox didn't have a great season, which meant that they did not hit the Jordan's sign in Fenway Park. Thus, in October, we found ourselves with about $300 to use at Jordan's Furniture. Tyler and I were excited about the shopping trip because our place was in desperate need of more lighting fixtures. Eighteen foot ceilings require LOTS of light.

When we got to Jordan's, we were disappointed. A few items caught Tyler's eye, but I wasn't satisfied with the merchandise. I reasoned that we could come back a few weeks later when (hopefully) new merchandise had arrived. So, about a month later, we returned.

This time, I had promised Tyler that we wouldn't walk out of the store empty-handed. Determined to complete our mission, we perused the multitude of rooms that comprise Jordan's Furniture store. Unfortunately, the one light that we really liked on our previous journey was no longer available. Again, we found a couple of pieces that we kind-of liked. Unfortunately, we couldn't bring ourselves to spend money - even free money - on items we both felt were either low quality or could be bought elsewhere for cheaper.

As we wound our way through Jordan's twisty paths, resigning ourselves to defeat, Tyler made a sudden stop. He threw up his arms, dragged me across the floor, and pointed, "What about this?! We should spend the money somehow. Why not this?!" I looked, laughed, and replied, "Really? You've got to be kidding me." "Come on. It'll be funny," he said. "What else are we going to do?" Looking back, I must have had some sort of equally psychotic moment because I said, "Ok. Let's do it!"

So, that afternoon, we walked out of Jordan's with this...

The picture!

We even paid $30 dollars of our own money to get it! As crazy as it still seems - using our $300 free dollars for a canvas painting that I still think I probably could make myself - the purchase has actually worked out well. The picture brought some much needed color into our bedroom, and filled up some of the large space between our bed and the ginormo ceilings. It has also made it very clear what my next project should be. Look at the picture. Can you guess?!

Sunday, January 20, 2013

It's Supper Time!

Although it has been a while for you, literally, three hours after Tyler and I brought the table base upstairs from being spray painted, we finished the job! We were sooooo close, so we figured, "Why not?!?!" And now, I get to share it with you! I'm soo excited!!

Being two smart cookies, Tyler and I had flipped the table top upside-down onto our "dining room" floor before we'd gone downstairs to bring up the freshly painted base. When the base arrived upstairs, we placed it like so...

Please ignore my unattractive face.
Our first goal was to situate the base so that it stood evenly between the sides and ends of the table. More importantly, however, we wanted the legs of the table to be as straight as possible. Therefore, before making any placement decisions, we used a level to ensure the legs stood perpendicularly to the table.

Tyler with our best friend, Mr. Level.

Much to our chagrin, we realized, when working with pipes, it is near impossible to ensure a perfect 90 angle between the table and the pipe. We just had to accept that we'd have to get it as close as possible. Once the legs were adjusted to our liking, we began by eyeballing the placement and setting the legs down where we thought they should go. We followed up with a ruler so that our placement was more precise. Tyler is the king of precision, and went around the table numerous times checking....

Folks, that is sheer determination right there. Look at his face!
Once all four legs had been Tyler tested and approved, Tyler drilled SHORT holes where each of the screws would go in each flange (flat metal piece at the top and base of each leg).

Here we gooooooooo!!!
Once all of the short drill holes had been made, we removed the base so that we could prep to make real, appropriate-length pilot holes. First, we had to clean up the short holes, which looked like this:


Then, we sanded them down and wiped away any wood shaving from the area. Now, we were ready to create the pilot holes. This was probably the trickiest part of the whole attachment process. The drill bit was much longer than the actual thickness of our tabletop. Therefore, if we created pilot holes by drilling straight into wood, we would end up creating sixteen holes in our tabletop, which is not the look we were going for! Instead, we wanted to create pilot holes that ran about 3/4" into our 1.25" top. This would create the perfect hole for the 1" wood screws that we had bought. The first quarter-inch of the screws would sit atop the flange and the remaining three-quarters would grab onto the tabletop, making for a secure connection. Consequently, we had to come up  with a solution that would ensure the drill did not pass through the entire thickness of the wood. After a brief brainstorming session, we ended up using a piece of scrap wood, about an inch thick, to make up for the discrepancy between the length of the drill bit and the thickness of the table top.


The extra layer of wood would allow Tyler to push the drill bit all the way down, but the drill would only end up penetrating the tabletop to where we wanted it. With a solution a hand, Tyler got to drilling.


Sixteen pilot holes later, I stepped in with the vacuum to clean up all of the wood shavings that now littered the table and our floor.


Once, this was done, we were ready for the LAST step - drilling the screws into place. Hah! It already happened and I'm getting excited just thinking about it again. We decided to drill two screws into each flange first to make certain all of the legs were attached properly before securing any of them fully. 


As Tyler drilled a screw into place, I put my weight on top of the legs at the appropriate end. We did this to ensure that we wouldn't shift the placement of the base as we secured the screws. Then, Tyler went back around on his own drilling the final two screws into each flange.


Fortunately, all that I described above went smoothly. Our solution to the small drilling crisis worked out, and all of the screws easily fit into the pilot holes we'd created for them. Therefore, when Tyler completed his second go-around with screws, we were done! AHHHHHHHHHHHH! WOOOOOO!! Celebration-party dance time! We were so excited and proud of ourselves, and I'm very happy to finally share with you our brand-spankin-new DIYed dining room table. We hope you come to eat with us soon!

Isn't she pretty?!

P.S. Tyler was super cute, and surprised me that night by not only making dinner, but setting the table so we could eat there together for the first time. What a great boyfriend. =)


P.P.S. In case you're interested, our dining room chairs are "Tobias chairs" from Ikea. They are made from plastic and chrome-plated steel, and are surprisingly comfortable. The seats are sold in clear or gray. We went with the gray, and love how they add to the industrial vibe of our apartment.