No!
Don't go!
You're in the right place.
I promise!
It's still "A Work in Progress", just prettier! After about a month of staring at the blog's white background and wondering why I'd ever thought a border of leaves represented the content of my blog, I have finally made changes!
If you know me, I'm not tech savvy. In fact, I usually keep myself a great distance from anything resembling technology. After having a smartphone for six weeks, I returned it for a flip phone. TRUE STORY. Since dating Tyler, the tendency to avoid technology has gotten much worse. He absolutely loves it, which means I don't have to deal with it. (*Sigh of happiness*) It's one of the many reasons why I love him.
Yes, I know. It's silly and lazy of me to think this way. I openly admit it. Nonetheless, I am very excited about the growth and development of this blog, and I very much want to make it my own. Consequently, when I got home this evening, I had a little talk with myself, dug down deep and scheduled a date with the computer. In my fifteen minutes on Blogger, I'd say I accomplished a great deal. One might even say I mastered the web. Okay, "mastered" is definitely a stretch, but I totally figured some stuff out. =)
Enjoy the new look!
Thursday, January 17, 2013

Parking Lot Painting
After the tabletop was stained and sealed, we were on a roll! All that remained to be done was spray painting the base of our table and attaching the two units together. Unfortunately, this was easier said than done.
With a couple of projects I've done pre-blog, I've discovered how fun and easy spray paint is. All you have to do is point and shoot. Unfortunately, spray paint and cold weather do not mix well, and most cans advise that you spray paint when the temperature is between 50 to 70 degrees Farenheit. Well, it's winter in New England and the temperature is rarely ever above 50 degrees! BOO.
So, the base just sat and sat and sat some more. We considered moving it into a large, airy indoor space and doing the painting there, but the idea of unscrewing the pipes, putting them in my car, driving them to another location, reassembling, painting, disassembling, etc. proved to be too much for our brains to handle.
So, the base continued to sit and sit and sit. Until, as you might imagine, the day finally came when we could spray paint! This past Sunday, the weather gods smiled down on us and Tyler and I took the opportunity to move the base from our apartment to the very large parking lot outside. We laid the base on a plastic tarp and secured it with various heavy objects. We took these two precautions because 1)we didn't want our building supervisor to get mad at us for painting the ground - although theoretically the black paint shouldn't have showed up on the tar, and 2) there was just enough wind to cause concern that the tarp might fly up, ruining our paint job.
To paint the pipes, we bought two cans of Valspar Flat Black spray paint.


to sexy black!

With a couple of projects I've done pre-blog, I've discovered how fun and easy spray paint is. All you have to do is point and shoot. Unfortunately, spray paint and cold weather do not mix well, and most cans advise that you spray paint when the temperature is between 50 to 70 degrees Farenheit. Well, it's winter in New England and the temperature is rarely ever above 50 degrees! BOO.
So, the base just sat and sat and sat some more. We considered moving it into a large, airy indoor space and doing the painting there, but the idea of unscrewing the pipes, putting them in my car, driving them to another location, reassembling, painting, disassembling, etc. proved to be too much for our brains to handle.
So, the base continued to sit and sit and sit. Until, as you might imagine, the day finally came when we could spray paint! This past Sunday, the weather gods smiled down on us and Tyler and I took the opportunity to move the base from our apartment to the very large parking lot outside. We laid the base on a plastic tarp and secured it with various heavy objects. We took these two precautions because 1)we didn't want our building supervisor to get mad at us for painting the ground - although theoretically the black paint shouldn't have showed up on the tar, and 2) there was just enough wind to cause concern that the tarp might fly up, ruining our paint job.
To paint the pipes, we bought two cans of Valspar Flat Black spray paint.
To use spray paint, you have to shake the can thoroughly (about a minute or so) before its use. Very happily, I whipped out the first can of paint and got to shaking. When the right time came, I bent closely (6-8 inches) to the base and let 'er rip!! Now, you may think, "Hurrah! The table was getting painted", but no. Nooooooo, siree. The paint did not get the pipes. Instead, it leaked. All...Over...My...Hands. If you've never experienced this, well, that's good, because I don't think it normally does. However, spray paint oozing and dripping all over your skin does not feel good. In fact, it's a B&*$C to get off. (No, I wasn't perturbed or anything.) Nonetheless, I ventured forth like the brave (or crazy) DIYer I am and prayed that the second bottle would work properly. I definitely did not have the patience to make another trip to Lowes for more paint, nor did I want to waste the warm weather I had been blessed with. Fortunately, for you, me and Tyler, there is happy ending. When I hit the "spray button" on the next can, it worked! The paint went from the bottle to the table. Hallelujah!
The key to spray painting is keeping the can close (6-8 inches) to the object you're painting, but simultaneously moving the can back and forth over the object to create a THIN coat. If you let the can linger in one place to long, or go over the same surface too many times too quickly, you will cause the paint to drip. No one wants a drippy paint job. Therefore, several THIN coats are key. Luckily, you can apply coats every 5 minutes, so the process goes quickly. I ended up applying 3-4 coats of paint to the pipes, and only created 1 or 2 drips. Almost professional!
After fifty minutes of drying time, the pipes looked completely transformed. They went from this gunmetal-gray...


I have to admit though, before we spray painted the pipes, I wasn't sure I was going to like the black. After weeks of sitting in our apartment, my brain had gotten so used to the silvery-gray pipes that when we went to paint them I felt like I was losing a little piece of home. In the end though, both Tyler and I agreed, the black looked awesome!
Wednesday, January 16, 2013
Jolly Polly
Applying polyurethane seemed to take foooooooooorever. If I'm being reasonable, I have to admit this was probably because Tyler and I went on a two week vacation in the middle of the process. However, even without our reprieve from work, this step of the project would probably have eaten up a number of days in our schedule.
I should begin by saying this is NOT because polyurethane is difficult to apply. It's actually rather straightforward. To start, we bought Minwax Water-Based Polyurethane, which came in a cheerful blue can.

As with the stain, we applied the polyurethane with foam brushes. Someone recommended that we use a new brush with each coat of polyurethane, and I had read somewhere that you should mix the polyurethane thoroughly before each application. To this end, we also acquired a number of paint sticks and 3" foam brushes (large enough so that it wouldn't take forever to apply, but small enough to fit inside the can).


To apply the first coat, we lightly sanded the (top of the) stained surface. Water-based polyurethane "sticks" to the wood less easily than oil-based, making this a necessary step. After a light sanding, we used a damp cloth to remove any dust that had collected on the table's surface, and then went back over it again with a dry cloth to be extra-safe. Some bloggers recommend using a talc cloth, citing that it is especially effective at picking up little particles. I have yet to try.
Once the surface was poly-prepped, we opened our can of polyurethane and stirred it with one of our painting sticks. Then, we wet the brush, again, only going in about an inch, and wiped any excess off using the rim of the can. Overloading your brush here is BIG no-no. If you apply water-based polyurethane too thickly, it will leave you with a milky-white surface. Therefore, several thin layers of polyurethane is best.
I was super paranoid about turning the table white. Therefore, we made sure to apply the poly in a well-lit room, constantly checking from various angles to ensure there was no white film forming. Otherwise, our application was very similar to that of staining - brush on, spread out, check for bubbles or pools of liquid, continue spreading, check one more time, finally dip again, and repeat. Once the entire surface is covered, you need to let the polyurethane dry for at least two hours before reapplying.
Everything was going well for us until the fourth application to the top of our table. (We ended up going with six on the top and sides, and three on the bottom.) Then, my worst nightmare came true! WHITE!!!! One of the boards had a knot in it. After we'd applied stain, Tyler and I were really digging the way the knot stood out. It added a cool dimension to the tabletop's appearance. Unfortunately, the polyurethane and the knot did not mix well. To be honest, I'm not completely sure what happened, but somehow we messed up. Tyler and I had no idea what to do. I frantically searched the internet for help, but in the end, we went with our gut.
I ended up using my handy-dandy sanding tool to eliminate the poly over the knot. I don't actually know if I got rid of it all. I simply sanded until the surface felt differently than it had before - less smooth. Another sign that I had eliminated the poly was that specks of unstained wood began to show through. This is important. I didn't want to completely eliminate the stained surface. I just wanted to make sure that I got to it. Once the dust was wiped away from sanding, I reapplied stain to the area to ensure that I still had the dark finish that I wanted. Instead of letting the stain sit for 30 minutes, this time, I let it sit for 5. Then, I wiped it off, and let it dry overnight before applying my next coat of poly to the table top. Fortunately, it worked out for us. However, I can't make any guarantees for future projects. My fingers were crossed the entire time!
As I mentioned previously, we applied six coats of poly to the top and sides. Once this was done, we flipped the table over and did the underside. As with stain, be careful when applying any liquid to the base of your tabletop. You do not want seepage! If you aren't careful, the polyurethane will drip down the sides and collect on the underside of your underside (your top!) to form a rim around the edge of your tabletop. Thus, when applying poly here, it is never a bad idea to run you brush around the rim of (what will be the top) to ensure any poly that did collect spreads out before it dries.
Overall, I'm happy with our work. No drips on the tabletop, and no white film! When you see pictures of the finished product (Coming soon!), you might notice the poly added a slight sheen to the tabletop. We used poly with a "Clear Satin" finish, which creates this effect. If you desire a different look, poly comes in other finishes (matte, semi-gloss, gloss).
P.S. Of all of those paint sticks and foam brushes we bought, we ended up using only one each! Do yourself a favor and save the money. All you have to do is thoroughly rinse the brush when you're done with one coat, and it will be as good as new for a second two hours later. Also, it's okay to use the same paint stick over and over again to stir. When we weren't using ours, we rested it in a plastic dish. No big deal.
I should begin by saying this is NOT because polyurethane is difficult to apply. It's actually rather straightforward. To start, we bought Minwax Water-Based Polyurethane, which came in a cheerful blue can.
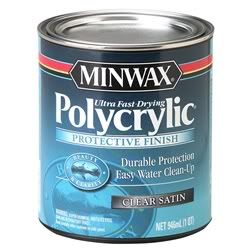
As with the stain, we applied the polyurethane with foam brushes. Someone recommended that we use a new brush with each coat of polyurethane, and I had read somewhere that you should mix the polyurethane thoroughly before each application. To this end, we also acquired a number of paint sticks and 3" foam brushes (large enough so that it wouldn't take forever to apply, but small enough to fit inside the can).


To apply the first coat, we lightly sanded the (top of the) stained surface. Water-based polyurethane "sticks" to the wood less easily than oil-based, making this a necessary step. After a light sanding, we used a damp cloth to remove any dust that had collected on the table's surface, and then went back over it again with a dry cloth to be extra-safe. Some bloggers recommend using a talc cloth, citing that it is especially effective at picking up little particles. I have yet to try.
Once the surface was poly-prepped, we opened our can of polyurethane and stirred it with one of our painting sticks. Then, we wet the brush, again, only going in about an inch, and wiped any excess off using the rim of the can. Overloading your brush here is BIG no-no. If you apply water-based polyurethane too thickly, it will leave you with a milky-white surface. Therefore, several thin layers of polyurethane is best.
I was super paranoid about turning the table white. Therefore, we made sure to apply the poly in a well-lit room, constantly checking from various angles to ensure there was no white film forming. Otherwise, our application was very similar to that of staining - brush on, spread out, check for bubbles or pools of liquid, continue spreading, check one more time, finally dip again, and repeat. Once the entire surface is covered, you need to let the polyurethane dry for at least two hours before reapplying.
Everything was going well for us until the fourth application to the top of our table. (We ended up going with six on the top and sides, and three on the bottom.) Then, my worst nightmare came true! WHITE!!!! One of the boards had a knot in it. After we'd applied stain, Tyler and I were really digging the way the knot stood out. It added a cool dimension to the tabletop's appearance. Unfortunately, the polyurethane and the knot did not mix well. To be honest, I'm not completely sure what happened, but somehow we messed up. Tyler and I had no idea what to do. I frantically searched the internet for help, but in the end, we went with our gut.
 |
| FYI: That is not our table! I just wanted to show you my cool power tool. |
I ended up using my handy-dandy sanding tool to eliminate the poly over the knot. I don't actually know if I got rid of it all. I simply sanded until the surface felt differently than it had before - less smooth. Another sign that I had eliminated the poly was that specks of unstained wood began to show through. This is important. I didn't want to completely eliminate the stained surface. I just wanted to make sure that I got to it. Once the dust was wiped away from sanding, I reapplied stain to the area to ensure that I still had the dark finish that I wanted. Instead of letting the stain sit for 30 minutes, this time, I let it sit for 5. Then, I wiped it off, and let it dry overnight before applying my next coat of poly to the table top. Fortunately, it worked out for us. However, I can't make any guarantees for future projects. My fingers were crossed the entire time!
As I mentioned previously, we applied six coats of poly to the top and sides. Once this was done, we flipped the table over and did the underside. As with stain, be careful when applying any liquid to the base of your tabletop. You do not want seepage! If you aren't careful, the polyurethane will drip down the sides and collect on the underside of your underside (your top!) to form a rim around the edge of your tabletop. Thus, when applying poly here, it is never a bad idea to run you brush around the rim of (what will be the top) to ensure any poly that did collect spreads out before it dries.
Overall, I'm happy with our work. No drips on the tabletop, and no white film! When you see pictures of the finished product (Coming soon!), you might notice the poly added a slight sheen to the tabletop. We used poly with a "Clear Satin" finish, which creates this effect. If you desire a different look, poly comes in other finishes (matte, semi-gloss, gloss).
P.S. Of all of those paint sticks and foam brushes we bought, we ended up using only one each! Do yourself a favor and save the money. All you have to do is thoroughly rinse the brush when you're done with one coat, and it will be as good as new for a second two hours later. Also, it's okay to use the same paint stick over and over again to stir. When we weren't using ours, we rested it in a plastic dish. No big deal.
Subscribe to:
Posts (Atom)